Thursday, June 27, 2013

5-Star Collected Recipes for a Crowd (or Not!)

With summer gatherings in full swing, I'm sharing a few of my favorite collected recipes that have gone over very well with my family gatherings.  Whether you're the host, or you're taking a dish to someone else's gathering, these are all good ones that got rave reviews.  I've included links to the recipes I found, and I sometimes alter them with what's on hand in my pantry.

Salad #1:  Greek Orzo Salad  
I have made this salad MANY times (I could eat the entire bowl myself!).   It's a pretty salad, and takes about 1 hr from start to finish to make.  :)
You can tailor the ingredients (above) to your own liking for the Greek Orzo salad.
Notes for Greek Orzo salad:
  • Orzo is just another type of pasta, and can be in any grocery, alongside all other pastas.  It looks a lot like rice in its shape.
  • One major change I made to this recipe, consistently, is I increased the dressing by 1.5 times the amount of ingredients called for; otherwise it was a little too dry for my taste.  I calculated the amounts and wrote it on my printed sheet of the recipe so I wouldn't have to repeat the math exercise.
  • I substituted honey dijon mustard for dijon (it's what I had on hand).

Salad #2 (Super Easy - they'll think you made it!):  Wal-Mart Deli Amish Potato Salad and Wal-Mart Deli Original Potato Salad.  Just mix equal amounts (images are distorted) of each kind together for a "just right' combination of onion (original) and sweet & mustard-y (Amish) flavor.  Even my husband likes it! BAM!


Salad #3 (Easy, but I add ingredients):  Wal-Mart Macaroni Salad.  I add chopped cucumber, celery & green pepper to mine, for taste. It's a little too runny on its own, and I would advise you to drain a bit of the juice.
Each of these salads come in 16 oz., 32 oz. and 4 lb. containers.
Appetizer:  Caprese Salad Skewers.
I substitute Kraft's Light Balsamic Vinaigrette Dressing for Balsamic Vinegar for a little more oomph.


Dessert #1:  Tuxedo Brownie Cups
These are TO DIE FOR!  You can garnish them to suit your holiday:
Tuxedo brownie Cups 4th of July flag garnish (above): blueberries and strawberries, and one row no garnish.

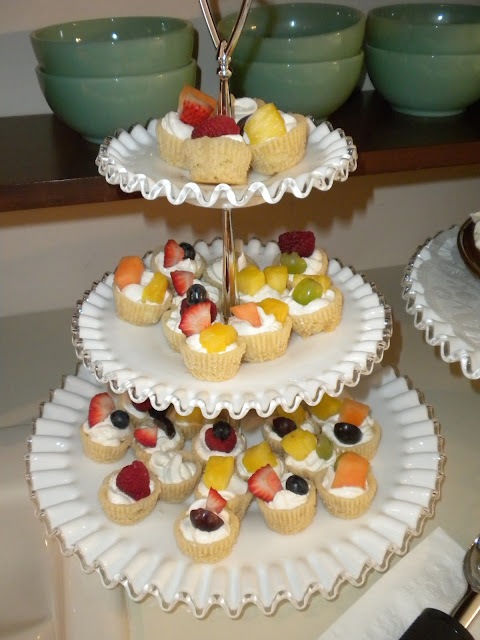
Dessert #2:  Mini Sugar Cookie Fruit Cups
These were great at Easter, and my family wants a repeat performance because they were SO GOOD, but they were a little more labor-intensive than I feel like doing for the 4th (they start out easy with Pillsbury prepared sugar cookie dough).  They would also make great baby or wedding shower desserts.  
My tips for the mini sugar cookie mini fruit cups:  (I read all the comments on this blog from which I linked the recipe beforehand, and compiled my own version as a result):
  • I used paper cup liners for my mini pans (peeled & discarded before assembling).  Some of them fell apart as I did this ("to the victor goes the spoils" was my theory).
  • I made the cookie cups, and filling (separate from each other) 1 day ahead & kept refrigerated in air-tight container until ready to assemble.  I made the filling as suggested, and propped it upright in my fridge, taping the freezer bag in a cone shape so the filling would be ready to squeeze when I was ready.
  • I filled the fruit cups with the filling a few hours before my get-together, refrigerated again, and garnished with the already cut fruit just before placing on serving tray.
Dessert #3:  Paula Deen's Lemon Blossoms
I made these last summer, and they were a hit - light & tart, the way lemon should be!  I believe I will make these again for the 4th, as an homage to Ms. Deen and her current public struggle she is dealing with.
Finished blossom photo above not my own - from Crazy About Cakes blog link recipe.

My notes on the lemon blossoms recipe:
  • The photo above of the ingredients shows the larger (4.3 oz) box of cook & serve pudding - it's what I had on hand (not instant).  I just used ~ 3.4 oz., as called for (just the box contents, not all the added ingredients).
  • I used approximately 2 1/2 lemons for this recipe (it calls for 1 for the zest, but for the 1/3 C lemon juice, I used the real thing, freshly squeezed).
  • The finished photo shows, but the recipe does not explicitly say, the cups are depressed for the glaze to gather and puddle.  To do this, gently depress the cake cups with the back of a spoon minutes after pulled from the oven (baked).
That's it for now for my tried-and-true collection of successful recipes for a crowd (or not {wink}).  If you're like me, you're making your list for the 4th now.  If you try any of those above, let me know your crowd's reviews.
Happy Gathering, y'all!  And don't forget the deviled eggs, fruit & veggie trays!  Not to mention the iced tea!  All are summertime crowd pleasers!
Sharing with:
Fun in the Sun Link Up
Common Ground Be Inspired #146

Wednesday, June 26, 2013

Collected Cast of Garden Characters

My current landscape garden is approaching ten years and, being the collector I am, I have been curating characters for my garden all along, even prior to our renovation in 2004.  Our yard is large enough that I can enjoy several pieces of hardscape throughout, without it feeling too crowded.  I've collected several characters for my garden over the years.  I primarily adopt my characters from estate sales, auctions and antique malls, but a couple have come new, from retail stores.  Most are heavy concrete.  Allow me to introduce you to my cast of collected characters.....
Namaste!  This is my buddha, a nod to my mother, who collected buddhas in the 1970s.  He stands under my Japanese Maple, and appears as though he's holding up the branch above him.

Next is my reclining cherub, who resides under my weeping cedar atlas.  I most definitely have a thing for putti, as you will soon conclude.
Next up is my 3-foot tall, 250 pound bookworm putti, the only character I felt needed a name; hence, meet Augustine.
I have had lots of photo fun with Augustine, snapping shots of him from various angles, and at different times of the year.  The photo above would have been late July - mid-August, when the black-eyed Susans are at their peek.
This one, titled, "Do these flowers make my butt look big?" was taken in late April a couple of years ago.
And in the winter photo above, Augustine is a cone-head, donning his winter scarf.
This sweet little angel is a thumb-sucking, seated cherub.  Here, she is perched on a capstone of the brick garden wall, soaking up the Autumn sun.  She's really quite little....in the wintertime, I take her down from the high wall and perch her upon one of my birdbath blocks in the garden mulch.
Brrrr.....baby, it's cold outside!

My husband and I are ballroom dancers, so these guys pay homage to our dance.  They're perched on the edge of my lavender bed.
I had a sweet, miniature chocolate poodle for 11 years (she died way too young), and this little character is a tribute to her.  She sits close just outside the sunroom door, next to the putti planter.
And if you're going to have rabbits in the garden, this is the best kind - cast iron!  He sits on my front entry stoop.
And just to the right of my front door, in the mulch bed, is my cherub, announcing any visitors or, in this case, the season of Spring.
I also collect random vintage garden items, such as metal frogs, spigots, sprinklers and nozzles, plant tenders, garden hand tools, watering cans.  The chunk of what looks like sea glass you see in the photo above came from our the Libbey-Owens-Ford glass plant that operated in our town from 1917 through 1963, where many a fruit jar, beer and Coke bottle was made.  A lot of the old-timers who worked there had them in their garden, and they can still be found at estate sales.  This one came from a neighbor's yard, whose estate sale I hosted.  He gifted the glass chunk to me.

This past winter, I acquired four new [old] putti, representing the seasons:  Winter, Spring, Summer and Fall.  It was my consolation for having to cut down the last two of my three white birch trees in my landscape.  I had up-lighting on each of the trees, and my plan is to locate these guys in those locations, maybe on blocks like my birdbath perches, or something taller.  I haven't quite figured it out yet because it won't be easy to find four vintage perches, short or tall, all simultaneously (like I did these guys!), but that's how it is when you curate a collection - you just wait.  Meanwhile, they sit in my courtyard, like characters waiting in the wings, ready to take center stage.
ABOVE:  Winter (with cloak) and Spring (with garland of roses, draped).
BELOW:  Summer (holding a bunch of grapes) and Fall (holding sheaths of wheat).
Gardening certainly does grow the spirit, at least it does mine.  And my characters keep me smiling while I'm in the garden.  I'm happy they're there.

Friday, June 21, 2013

Lavender Wand Tutorial

Last weekend, I posted on Crafts & Recipes Using Lavender, and promised a tutorial on the lavender wands (pictured).  Here are the step-by-step instructions, with photos to help you do your own.  Feel free to Pin, Facebook or Tweet from this post; I only request that you be polite and credit my photos and text by linking back to my post.  Plagiarizing would just be rude, don't you think?

Note:  I have read differing opinions on whether you should use freshly harvested lavender vs. already dried lavender for this project, as it relates to the pliability of the stems when you're working with them.  For those of you who dry lavender, you should already be wondering why anyone would want to use anything other than dried lavender, right?  And the reason for that is because if you would make the wand with fresh lavender, it may look great today, but the natural shrinkage of lavender in the drying process would be like having a nice grape today and a wrinkled raisin tomorrow - your wand's bulb being that grape/raisin in the analogy.  So, I will recommend using already dried lavender, and if the stems are not pliable enough, have a mister bottle (spritz nozzle/handle) ready to spritz the stems, and only if necessary. (I have tried both fresh & dried, and the results were raisin & grape, respectively.  And when I used dried stems, I did not need to spritz.  I was very careful in step #3).

Supplies Needed:
  • 13 - 17 dried lavender stems, with stems cut at least 8-10" below the flower head.  Make sure you have an uneven number of stems.
  • One strand of 1/4 inch ribbon, approximately 24- 30" long , preferably double-sided satin, but grosgrain will do. I bought my ribbon here.
  • Spritz bottle with water, only if necessary, to make stems pliable while working with them.  You can find these cheaply at any drug store, usually in the cosmetics section.
Step-by-Step Process:  Note that the photos are placed below the numbered step process descriptions.
  1. Start by stripping all the leaf foliage off of the lavender stems (I do this when I cut it off the plant).  You can just grab the stem between forefinger & thumb and run them in the opposite direction of the growth - they should come right off.
  2. Grab the stems together, and make all the flower head bottom bases flush to each other, in a bouquet-like fashion, holding between your thumb & forefinger.  Tie the ribbon around the base of the bouquet, leaving about  1" of one end of the ribbon. I knotted my ribbon by tying it twice.
  3. This is [one of] the tricky steps.  Holding the knot of the bouquet, invert the bouquet and carefully take the stems and splay them, similar to a bicycle's wheel of spokes or one of those vintage drying racks.  You'll want to separate them from each other so they don't overlap.   If your stems are too brittle and you think they may snap, you can spritz very lightly here, but only if necessary. You will be weaving the ribbon over and under these stems (in step #6).
  4. Next, continue bending those stems over the bouquet so they are ultimately facing straight down, completely inverted from their original direction, splayed over what will become the bulb of your wand.  
  5. You will now grab the long piece of the ribbon from the center of the bouquet and move it to the outside of the bulb and inverted stems.  Be careful to keep the short piece of ribbon tucked downward over the flower head of one stem.  
  6. Start weaving the long ribbon over one stem, then under the next.  Be careful to keep those stems from overlapping on the bouquet - this is where you'll be glad you started with no more than 17 stems.  Continue this process until you have completely encircled your bulb.  You will see that if you lose track of the splaying, you can easily lose your basket-weave pattern and need to undo the weave until it's back on track.  And it can be quite easy [and frustrating] for the stems to somehow burrow themselves to the center and lose their place on the so-called wheel of spokes (see Step #3).
  7. Continue weaving the ribbon, over and under the stems.  The hardest part is the first couple of rows, and it begins to get a little easier by the time you reach the third row. 
  8. When you reach the base of the flower bouquet bulb, you will tie a loop, similar to what you did at the base of the flower head bouquet (Step #2), only don't double knot (see Step # 2). 
  9. Once looped, grab the ribbon and turn it in the opposite direction and wrap it around the stems again, until you reach the start position once more. 
  10. Loop the ribbon each time you come back to the original start position, and then grab the ribbon and turn it in the opposite direction, repeatedly.  
  11. Your ribbon will begin to look similar to tied pointe shoes ribbons, criss-crossed with each looping turn.
  12. When you finishing wrapping your ribbon to the wand's desired length, you can then double knot your last loop.  Then take the remaining ribbon and make two loops (as in tying a pair of shoestrings), and, while holding the two loops, tie them in a loop, together.  Don't worry about the loss of some of the lavender buds, it will happen.
13.   You can then trim the stems at the bottom for a clean finish, either straight across, or at an angle.  Sit      back and admire your work, or at least your exercise in practicing patience! 
Lavender is a soothing herb, so even if making the wand tries your patience, hopefully the fragrance of the lavender would partially offset that irritation. :)

Feel free to make your wand bulb larger by simply using more stems - just be sure to keep it an uneven number for the basketweave.

Your feedback on the clarity of this tutorial, if you try it, will be appreciated.  If you get stuck along the way, feel free to email me, and I'll try to be responsive in a timely manner.
~R


Wednesday, June 19, 2013

Timewashed's Giveaway

One really cool thing about blogging, and I know it sounds cliche but it's so true, is the chance to meet so many virtual friends (and if you're lucky, you get to meet them in real life!).  I have a feature post today and link to a giveaway to one of those I've met here in the blogosphere.  Becky of Timewashed  is a blogger/creator in Florida, and she creates many inspiring items, working with ephemera, vintage laces, and some other surprising items.  

So what are you waiting for?  Take a minute to visit her now (there's a hyperlink above and at the end of this post), and see a facsimile of the great little inspiration/gift wrap kit she's put together as a giveaway!  All you have to do is sign up to follow her, and post a comment on her Blissful White Wednesday post where she tells all about it!  


Becky also has a shop:  Timewashed Etsy, where I had the pleasure of purchasing a few great items from her when I first spotted her craft on another friend's blog, Kris, at Junk Chic Cottage.  AND, Becky also did a custom order for me, wherein I provided her some doorknobs for her to make me a little vintage rose garden.  

Here's a photo of my custom ordered rose garden that Becky crafted for me, with two of the three doorknobs which I provided (displayed with one one of my vintage linen/lavender sachet):  

And here's a photo of my original purchase from Becky:  a doorknob rose, a bird topiary, and the sweetest little bird nest mason jar lid (in my sunroom, with my little terra cotta gardener).

Every Wednesday, Becky hosts a Blissful White Wednesday, highlighting various bloggers who link up their white inspirations.  Go join her party and get in on her giveaway!


Sunday, June 16, 2013

Crafts & Recipes Using Harvested Lavender

My sisters and I have been growing lavender for several years, with the intention of crafting it into potential items for resale and gifting.  This year has been a particularly good harvest already, so I'll share a couple of items we've created in the past and are planning to continue.  You may or may not be aware, but one of lavender's best-selling traits, besides being a relaxing herb, is that it is a natural pest repellent, making it an excellent item to use for natural fiber storage such as fine clothing and linens, and even vintage purses.  

Sister M is the most artistic of us all, and she has made many sachets, using dried lavender buds and vintage linens, mostly hankies and napkins.  She then adorns the sachets with vintage buttons, usually mother-of-pearl, and most times hand-paints the buttons with teeny, tiny flowers.  Here's a sample of various sizes of the sachets:
Lavender sachets from vintage linens & trimmed with hand-painted buttons
The detail on these flowers is really amazing.  Here's a closeup of the two bottom sachets' hand-decorated buttons from the above photo, intentionally complementing the design in the hankies used on the flaps:

And, sometimes the linens are beautiful enough to use for sachets, without additional decoration, as in the case of this one, where a monogrammed napkin serves as the flap:
The body of the sachet is usually made from vintage damask tablecloths, something we have in abundance.  When completed, these sachets are not stuffed with anything but the real deal - all lavender buds we've harvested, and they last for years!  All you have to do to release the fragrance is squeeze the sachet, and they're as good as new!    I've actually used the larger one under my down pillow at night for an intoxicating, relaxing sleep. We sell these in our antique booth space, and they make excellent gifts for teachers, hostesses, gal pals, and yourself!  

The other item I just tried my hands with creating this week (and has potential as another salable item) was a lavender wand.  I have a couple of these that I purchased from an antique dealer several years ago, and they were quite expensive.  I can see why now, as they are time-intensive.  The size of those I purchased were nearly equal to that of a wooden sock darner - certainly smaller than a maraca, but larger than the ones I made (I actually made two), which were just a bit bigger than those large Q-tips they use in medical settings.
I read that it was best to start with anywhere from 13 - 15 individual stems of lavender for a first attempt, so I complied with the suggestion, and it made sense.  The process is somewhat tedious, especially in the beginning, and it took me about 30 minutes to complete this from start to finish.  But again, it's a great way to utilize the lavender, and makes a nice little sachet.  I can also see a bouquet of these (using more stems to make the bulb a little larger would be my preference and goal) in a vintage white ironstone pitcher in a bedroom or bath.

I'm planning to create a step-by-step photo tutorial of how I made this wand, and will plan to share it in a future post, including lessons learned.  I gave my first one to my neighbor this past weekend as a hostess gift at a neighborhood get-together, tied with a little burlap sack and filled with some clay plant markers that say "GROW IN PEACE".  Like me, she's a gardener, and she really appreciated the token. 

So, whether it's harvested and dried, made into a sachet, a wand, or just sitting pretty in a bowl, I'm super excited about my lavender crop this year.  The beauty and fragrance abounds, and I've already got my sights on a lavender-lemon shortbread recipe, and thinking about lavender sugar scrub and lavender bath salts!

Linking with Anita at Cedar Hill Ranch, who's hosting this week's "The Scoop Link Party Tuesdays #71", and Becky at Timewashed, hosting her Blissful Whites Wednesday.

Thursday, June 13, 2013

Three Sisters, Three Vintage Styles

Panoply is what my sisters & I call ourselves in our antiquing ventures.  We each have specific interests in our collecting/buying, and we're each unique in that regard.  I thought I'd share a vignette or two from each of our homes to demonstrate each of our styles.  Our styles, by the way, carry over to our shopping choices when buying vintage and antique items.  

Disclaimer:  when shopping and one spots "the" item, the other two will naturally try to find something similar, it happens.  Or, when one sells a particular item in our booth space, chances are the other two may look for one (or ten) just like it, it happens.

Here is a view of my sister M's style.  This is her master bath, created in a Country Romantic theme.
 M uses an antique pie safe for vintage linen storage at the end of her claw foot tub.  She is a master doll maker (porcelain), and she selectively displays some of her best examples throughout her home.
Opposite the tub is the his/hers vanity area, with dark green granite counter tops. The corner curio houses architectural salvage on top, a few miniature dolls in the cabinet, and a vintage WV Blenko (from our homeplace) on the lower shelf.
Living in easy at sister M's home - especially on the back porch.

Sister J thinks she was a servant in a former life, as her passion is authentic primitives - especially kitchen utensils.  She has a nice collection of crockery & tools, and has a particular fondness for small, architectural salvage. Here's a glimpse of her kitchen wall.
It's like "Where's Waldo?" when you're looking for the phone.  :)
J doesn't think twice about nailing a few tacks into her walls to display a cool grouping.
J's three adult kids already have a colored sticker claim process going on many of her pieces for their future acquisitions ("the corpse isn't even cold and they're takin' the rings off her fingers!"). ;)

And there's me - I'm the Flapper girl.  My favorite collection is my vintage and antique purse collections, especially from the turn of the 20th C into the 1930's, the Art Deco period.  Here's a glimpse of my office / guest room (if it has to be!) space:
I have three large windows in here, which makes capturing a photo very difficult.  In the far left corner is a curio which stands behind my desk.  It has three shelves loaded with part of my purse collection. 

Top Shelf
Middle Shelf
Bottom Shelf
 To the right of my office space is a wardrobe I use for off-season clothes storage, and the outside (and top!) has become my bulletin board for more purse displays:
Wardrobe "bulletin board" display of purses
This is my mesh purse display in my favorite room, the guest bedroom.  

So, what we have in Panoply is a "wide-ranging array" - a little bit of Country Romantic, a bit of Primitive, and a bit of  Flapper.  It certainly makes for interesting displays in our booth spaces.  If you'd like to see more of what we do in our store displays, check out my Pinterest button on the right here on my blog, or click here to go directly to our board:  Panoply - Three Sisters' Antiques...

Have a great rest of the week! ~R