Wednesday, September 30, 2015

Pumpkin Cream Mist Autumn Tablescape

In early September I spotted some plates and tabletop accessories made by Better Homes and Gardens in our local WalMart called Pumpkin Cream Mist. The shelf with the plates was already bare from being sold out, so I went online to place an order as soon as I got home. I created a simple tablescape with those (salad) plates, and a couple of the tabletop accessories also purchased.
Do you remember in my post of our WV Road Trip to Cass Scenic Railroad, where I mentioned I purchased an artisan-made item in the co-op gallery there? I shared a glimpse of it then. It's the table runner you see in the photo below. I was so excited when I saw it, as it is made in the same style as the one my daughter made for my holiday table for Christmas in the Sunroom. Now I only need one for each of spring and summer. ;)
So, with the base textiles layered on the table, I added gold chargers (Dollar Tree), my everyday Pfaltzgraff dinner plates, and the BHG Pumpkin Cream Mist salad plates.
Vintage additions to the table include the Oneida flatware from the 1940's.
Other vintage additions are Lenox Impromptu brown water stems and Libbey everyday glasses with an octagonal, wood-grain for added texture (both, 1970's).
Vintage linen tea towels in fall hues of brown, apricot, forest and lime green are used as napkins, and pewter salt and peppers shaped as a pear and apple are keeping with the autumn theme. I also bought the BHG Pumpkin Cream Mist platter and tureen with ladle as serving pieces.


The traditional colors of autumn are in full force in my sunroom this year.

After the dishes were all put away, the runner was placed on my dining room table, beneath my recent rooster find.
The Pumpkin Cream Mist tureen and ladle were placed side-by-side on a folding game table in the dining room with my framed Calmady Children find. Both the rooster and Calmady Children finds were referenced in my post, here.
Are you thinking in terms of layers when it comes to autumn decor? Do you find the transitioning of the seasons something you look forward to? Which season is your favorite? I think springtime is mine, with autumn a close second.

If you'd like to see more of my tablescapes, you can type the word 'tablescapes' in the search block near the top of my sidebar, and several more should come up for you to see and read at your leisure. You can do the same with other keywords.

As always, I appreciate your visit!
Rita C. at Panoply

Sharing with any given number of these fine hosts:

Sunday, September 27, 2015

WV Road Trip: Cass Scenic Railroad Adventure

Mr. P and I made another road trip adventure within our state bounds a little over a week ago, to Cass Scenic Railroad State Park in Pocahontas County, WV. It's about a 3.5 hour drive to get there from the capital city and, being retired, well, we just made a couple days of the trip. Listen to the sounds of the restored coal-fired, steam engine from the past as it pulled into the station! This trip was truly like turning the pages back in time, to another era, when logging became big business in our state. 

One thing very common in West Virginia is a network of curvy, steep-graded roads, as well as plenty of pasture land valleys. The road to the state park was as enjoyable as our train excursion. Signs of early fall were all around in the early morning: fog, tree canopied roads, baled hay on dewy ground, and webs of spiders' work from the night before.
There was also plenty of wildlife and livestock to be seen (and dodged) along the country roads. We saw deer, fox, geese, squirrels, turkeys, horses, cattle and sheep all along the drive. We did not see black bear (our state animal).
Just look at those sheep! A full view of the top left frame shows the one deer (center) behind the fence appearing to have a spider mask on, which I only noticed after uploading my photos. :)
We arrived at the station just in time to snap a few photos and capture a sense of the history that put this place on the map more than 100 years prior with its prominent, technologically advanced (for its time) logging industry and community.
What was once a storage facility for the coal (another big industry for this state) that operated the steam engines of the logging trains is now an artisans' gallery during the train season (May - October) for the Pocahontas County Artisans' Co-op. Just as the sign within the collage below says, "Cool Stuff made by Local Folks", and I found something special to bring home with me. You can catch a glimpse of it (below), and I'll be sharing that in an upcoming post. West Virginia's artisans have a very strong presence and are celebrated throughout our state, most notably at Tamarack Center, WV's retail artisan center, in Beckley, WV, but the gallery in Cass had a nice selection, too.
It was remarkable to experience how the restored, piston-engine Shay locomotives and former logging cars (now restored for passengers) trekked through dense, steeply-graded forests into the heart of yesteryear's logging days. We passed through an old, lumber graveyard (Hey, wait! Those rail carts can still be used today - coffee tables!)
We also learned a few things about how these trains go through switchbacks, reversing direction in order to better climb the steep grades of the mountains to the peak 4700', while billowing smoke and cinders along the way. The steep grade of Cass (11%) compares to a conventional 2% grade, which is considered steep for railroads. Depending on which car you were in, you would get covered with smoke and cinders from the billowing stack (we rode the last car, furthest from the engine, and still caught the effects!). We wore the recommended dark clothing (that could be machine-washed later).
We made two stops before reaching the summit: the first at Whittaker Station, an open field area with vast views of the hills beyond. It is here where the equipment which once hauled the logs of trees timbered in the forest as much as 3000' in the air were on display. 
Re-creations of the camp shanties in which the more skilled lumbermen lived were also on display. These shanties were merely 12' x 16', sized to be picked up by a log loader and put on rail cars in order to relocate the campsite.
Our next stop was in a location to refill the steam engine tanks of spring water. At this point, we had some passengers embark/disembark, coming/going from another train 60 miles away from/to the town of Elkins, WV. We had travelers from various states getting on and off board that day - MI, PA, IN, KS - to name just a few on our car. Boxed lunches were loaded and passed out to each of us there, and we continued up the mountain to our summit destination, Bald Knob.
Our engineer shared information of the flora seen along our path, most notably Spruce (those which were timbered in Cass' heyday), and the Mountain Ash trees, which only grow above 3800'. The Mountain Ash were full of berries (as seen in the photo above). Color in other trees was nowhere near peak (two more weeks), or even beginning, really, but we enjoyed the views no less. Our peak at Bald Knob was an elevation of 4700'. At one point, it was noted that the farmost mountainous line we were viewing in our distance was the Eastern Continental Divide within West Virginia (top frame of photo collage below). This is the watershed divide in the eastern US, wherein all waters east of the divide flow into the Atlantic Ocean; those west of the divide flow into the Gulf of Mexico.
Also noteworthy of the collage above, in the bottom right hand frame, the peak to the far right is Bald Knob, and the left hand frame at bottom shows us standing on that summit of Bald Knob.
The photo above shows the observatory deck at Bald Knob (note the sea of goldenrod all around), with the frame below it showing the view from beneath the deck. Also, see that pinpoint white in the distance in several of these frames? The right frame in the above collage shows it, enlarged. That's the Green Bank National Radio Astronomy Observatory Telescope. It is the world's largest, fully-steerable radio telescope. Can you say radio silence?? 

After a total 4.5 hours on the train trip, most of which the return was screeching brakes on rails as we came down the mountain, we hopped in our car and headed up the mountain behind the station to Snowshoe Mountain Village, WV for the night. A noted ski resort in our state, its elevation is 4848'. As snow is a couple months away, we practically had the mountain to ourselves, and woke up to the view you see in the lower frame of the collage below.
As if all these visuals weren't enough on this road trip, on our way home, we passed Mile Marker 139 on I-64 and saw the following sign on a bridge, crossing the New River.
It's hard to read, but the sign says "Mary Draper Ingles Bridge". If you have ever read the book, Follow the River (James Alexander Thom), you know the story of this woman's escape from being taken captive by Shawnee Indians in 1755, and her plight of wandering more than 500 miles by foot, crossing many of the mountains and waters you've seen pictured here, all the way from Ohio to the present day Blacksburg, Virginia area. If you've never read the account, you really should. What a woman Mary Draper Ingles was! She traversed over much of West Virginia, and this bridge marks just one of the areas where she followed the river to return home. We live along another of the rivers she followed, the Kanawha. It is a fascinating story of determination, strength, faith and love.

This was another action-packed road trip, one of many in our Wild, Wonderful, West Virginia! It was a trip that could be enjoyed by kids from 2 to 92. If you'd like to read of our last adventure, it's all in this post titled, Day Trip Adventure: Bridge Crossing - by Catwalk!, in the New River Gorge National Park.

As always, thanks for your visit!
Rita C. at Panoply

Sharing with any given number of these fine hosts:

Thursday, September 24, 2015

Cleaning Silverplate the Easy Way

In my recent Sunflower Tablescape, I used a vintage set of Oneida silverplate utensils I had purchased very inexpensively at an estate sale. It sat for more than a year in storage, simply because it was tarnished and I didn't want to clean it. I wanted a quick fix so I could use it in my tablescape.
Tarnished Silverplate Before Soaking
I remotely remembered a quick-soak method of cleaning silverplate, but after realizing I hadn't pinned the recipe to any of my Pinterest boards, I Googled it. I found one, which was pretty loose in its measures, so I winged it.

DISCLAIMER: Try this method of cleaning your silverplate at your own risk. I am not recommending this method for sterling silver, and do not make any guarantees or warranties for your outcome. Mine was inexpensive silverplate, so I figured I had nothing to lose and everything to gain.
Ingredients for Quick Soak
The recipe calls for:
  • Aluminum Foil
  • Hot water (I filled the pot in the photo above, and heated to just before boiling)
  • Table salt
  • Baking Soda
  • Clean Towels 
  • Tongs (not pictured)
Directions:
  • Line a wash basin (I used my utility sink, which is nice and big) with aluminum foil
  • Measure at least 2 TBSP each of baking soda and salt; sprinkle into the basin
  • Pour hot water into basin CAREFULLY  
  • Place your tarnished silverplate in the basin, making sure the foil touches the utensils, but no utensils overlap (do as I say, not as I do, lol, and see comments below). 
  • Use the tongs to carefully turn and eventually lift the utensils out of the soak (the utensils will be very hot to touch!), once you're pleased with the clean and shiny appearance. This only took about five minutes. That's it! 
Utensils, Soaking
You'll notice as the tarnish goes away, the aluminum foil darkens. I ended up repeating the process because of not following directions, as those pieces touching each other and not the foil needed a repeat soak. When completely finished lifting all the utensils from the soaking, I rid the sink of the dirty water and foil, and rinsed the utensils before drying each with the towels.

Once completely dry, I placed all the utensils back into a plastic tub for storage. Here's the best and most inexpensive trick I learned long ago for storing silverplate: silica gel packs. Yes, save those little packs every time you buy new shoes (and many other items), and they're part of the packaging! I use them with my sterling too. I like patina also, but sometimes I prefer the shiny, and the silica gel packs help keep the moisture out and minimize tarnish for longer periods. Of course, if you store your silverplate in felt chests, drawers or bags, you're already minimizing tarnish, but I even place the silica gel packs inside those felted protectors.
Utensils, After the Soak, with Silica Gel Packs for Storage
I have no idea what the physical or chemical science is behind this easy approach to cleaning silverplate, and my outcome was not perfect (due to my impatience), but it worked pretty well. I did notice a couple utensils with a bit of excessive plate wear afterward, but I did not inspect each piece carefully prior to my experiment to be able to say whether or not the soak was the cause or not. Mine was old silverplate to start with, so it may have just been age or how it was treated in its previous life. 
So, there you have it - cleaning silverplate the easy way. If nothing else, you can take away the trick of using the silica gel packs for minimizing tarnish. Those packs are good for a lot of other things too. I have it pinned to my Home Decor board on Pinterest if you're interested in repinning, but please do so from the original source. 

Have you ever tried this soaking method for cleaning silverplate, and how did it work for you? Did you do anything differently? Please share!

Thanks for your visit.
Rita C. at Panoply
(Thank you to Kathy at A Delightsome Life's Home and Garden Thursday Party and Richella at Imparting Grace's Grace at Home No. 175 for featuring this post!)

Sharing with any given number of these fine hosts:

Sunday, September 20, 2015

Panoply Booths - Early Autumn Redo

Sister M and I did a pretty major redo in our booth spaces a couple weeks ago, so it's time for a recap. If you want to backtrack, our previous major booth spaces were in this post: Panoply School Daze, Booth Maze Craze. If you don't backtrack, no worries, as I typically do before and after shots to keep a perspective on how we move things. A few more large ticket items sold since that last update, and we quickly jumped at the opportunity to move things around again.

In our farmhouse space, we moved the previously centralized garden items outside of our space and moved in a homemade, faux fireplace with bookshelves on the back wall. The photo below is the before (top) and after (bottom) that move:
Panoply B&A Faux Fireplace, Main Booth
This move required a good bit of adjusting the wall space behind, so not a whole lot of other items got shifted within this space since our last move in August (only smalls within the cases, which is time-consuming, but underwhelming for a recap). A better look at the fireplace area is below.
Panoply Faux Fireplace, Center Wall of Main Space - September
Sister J brought in a few new (old ) finds that flank the fireplace wall.
Left Wall of Faux Fireplace
Right Wall of Faux Fireplace
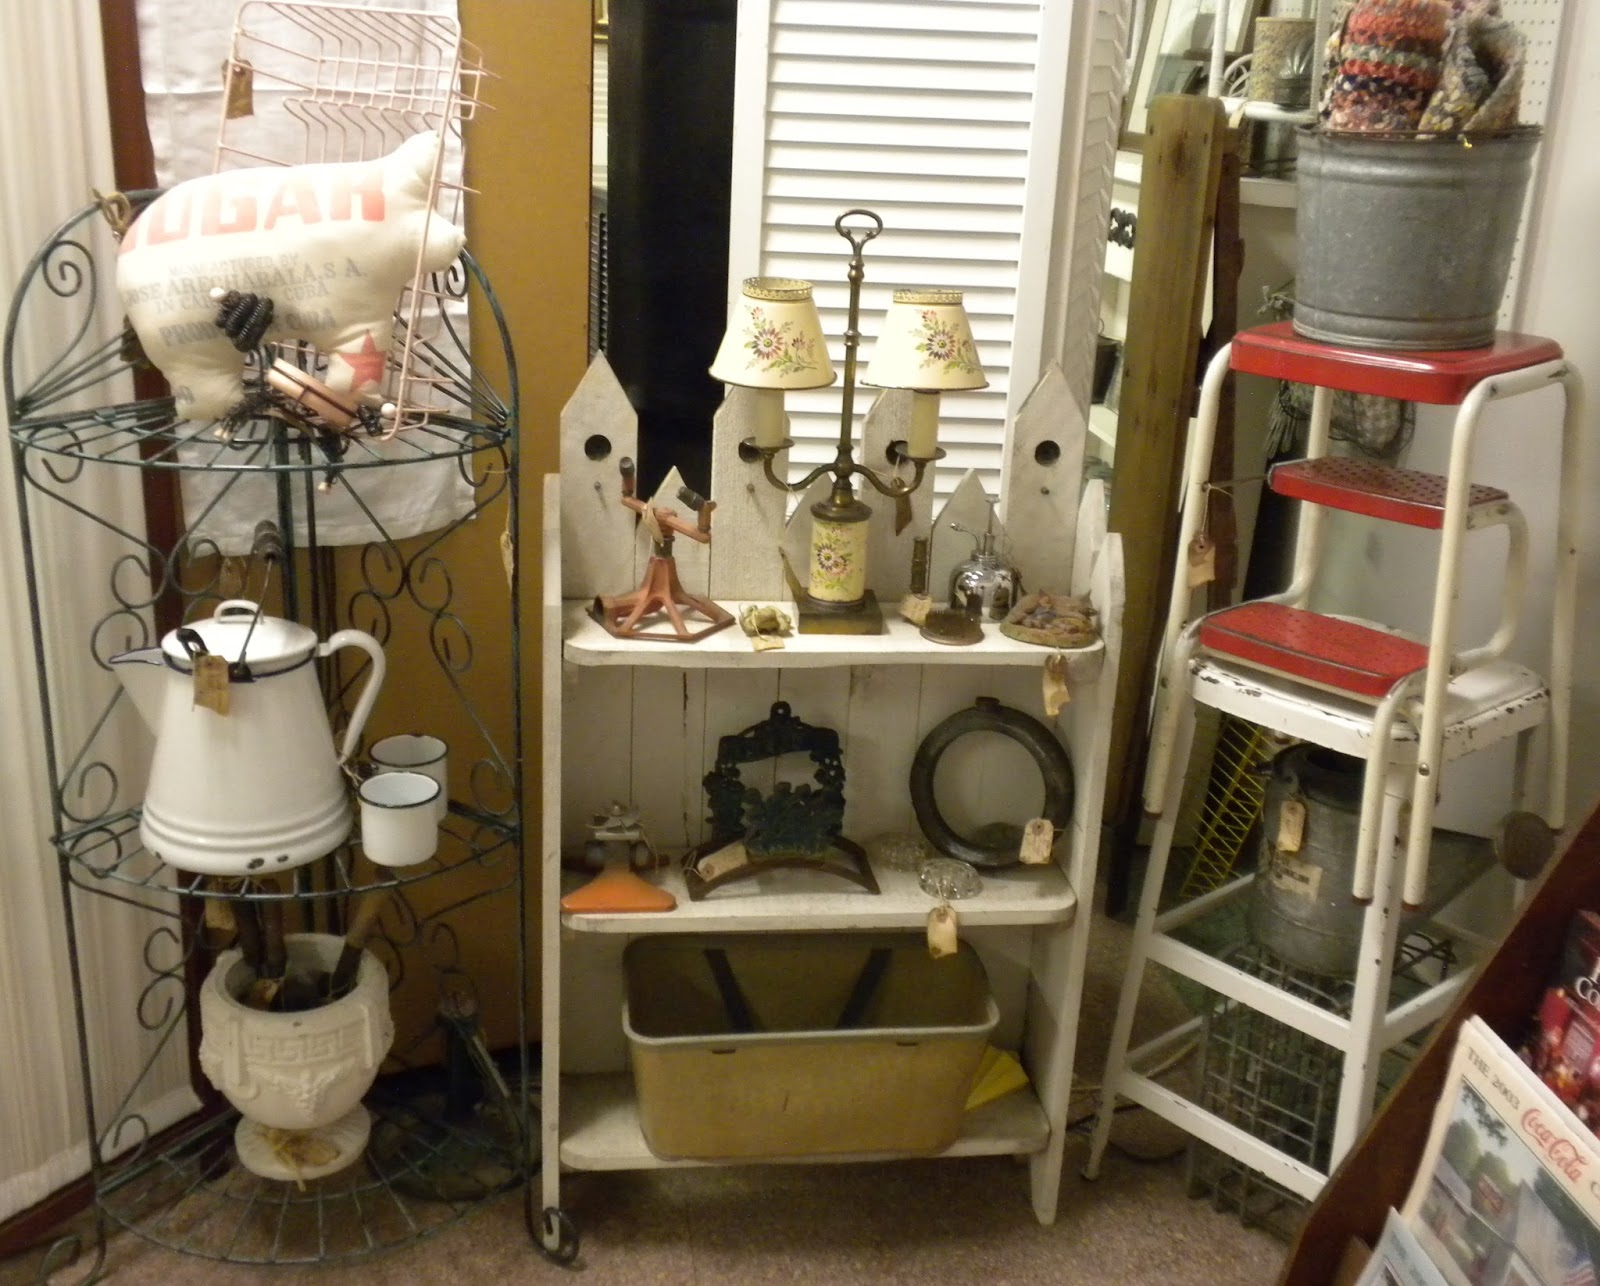
Next, we moved the central garden shelving unit and items which were displaced to the right of (and behind) our farmhouse area - the back porch, if you will. This area is just in front of our service elevator, and it's become a versatile space to move things that otherwise don't fit in anywhere else. The photo below shows three different looks in as many weeks during August - September. The last frame is how it's currently styled.
Panoply "Back Porch" Transitions: August-September
Here's a head-on view of that space now, although the tole lamp has since sold.
Panoply "Back Porch" - September
Our space we've dubbed the encampment area (fast becoming the "mantique boutique") had a big change too - we sold the jewelry chest! Here's a before (top) and after (bottom) shot of that space:
Panoply B&A Jewelry Chest Sold, Encampment Space
If you noticed, in that space now, the base table shifted from the main space (previously held the garden fence shelving section). The rolling cart was placed on top for higher visibility. The garden trellis leans on the wall, which would otherwise be blank (sheet rock with no pegboard to hang things). We are constantly trying to use our vertical space. Just last week this space's chairs were swapped for the stools you see in the photo below. 
Panoply Encampment Space - September
Moving across the aisle to what we call the living room - a more formal space - we sold the Barrister-type bookcase, which required a LOT of shuffling. Below is the before (left) and the after (right).
Panoply B&A Bookcase Sold - Living Room Space
If you look closely, that bookcase was chock full of crap vintage goodness, so we spent about two hours finding sensible places to put things.

On the other side of the louvered shelving wall unit diving the living room space, there were yet more changes. Our last setup had a back-to-school theme against the wall, while the center of the floor was styled with various carts and stools. The slant desk and plank chair sold quickly. Below is the before and after, from school theme to early autumn keeping room.
Panoply B&A School Desk, Chair Sold 
Since the desk and chair sold quickly, the back wall went through three looks in three weeks, just as the "back porch" did. It's really like working a living puzzle, fitting our vignettes not only in space constraints but in logical groupings.
Panoply Stair Landing Space Transitions: August-September
So, our space in this section, which is a highly trafficked aisle of the antique mall (and also right at the base of the stairs leading to second floor), now appears as the photo below.
Panoply Stair Landing Space, September
All four ladderback chairs are now in this space (the fourth was moved post photo). The louvered shelving wall unit is outfitted with mostly primitive pieces, with the cart of hardware to the left of it. This layout was intentional - a mix of masculine and feminine appeal - in both looking at the shelves and through them to the spaces beyond (the formal living room and the encampment, or mantique boutique, beyond.
Panoply Louvered Shelving Unit, September
Speaking of beyond, in the photo above, do you see that mahogany frame with ivory sheer divider to the left? That's the outside of our main (farmhouse) space, with the "back porch" just beyond. Here's what it looks like inside the booth space (below):
Panoply Wall Screen in Place, Early September
We use dividing screens like these with the intention of framing our space, and keeping unrelated, neighboring spaces separate. It's our version of  "good fences make good neighbors". Don't you know I received a call with a customer wanting to know my best price on this?? Until the first inquiry came awhile back, I had NFS (not for sale) on it, but then put an inflated $150 price tag on it. The customer was told they could only receive a 10% discount because I was unable to be reached for any better pricing. It SOLD! That's the kind of call that prompts a race to the store to "fix" the matter. Luckily, we had another screen on the opposite side and just moved it in place, so I'm happy for the sale.

Are we the only weird ones in this business who get their feathers ruffled when something sells?! Haha, I really need to get better at letting things go, as there's a world of stuff out there.

Those are the most current changes we've been through in our Panoply booth spaces. If you'd like to see more of our styling, just type "booth" or "booth spaces" into the search block on my sidebar, and several more posts will come up for your viewing. I also try to capture some of the significant space changes on my Pinterest board, "Panoply - Three Sisters' Antique and Other Treasures", which will lead you back to the original post. Feel free to follow me there and pin away (always from the original source, please).

Speaking of letting things go, we Panoply sisters are preparing for yet another go round of our community's yard sale, with nearly 100 participants, on the 26th. It's a great venue, with lots of parking and concessions, and it's our opportunity to purge slow-moving vintage items, as well as household things that never get into the antique mall. We're hoping not to have to rely on the rain date. I'll let you know how we do.

(Postscript:  thanks to a reader's email inquiry, I'm adding our location information). 
If you're traveling through any of the three interstates that intersect in our town of Charleston, West Virginia (I-64, I-77 or I-79), we'd love for you to stop by and see us at The South Charleston Antique Mall, 617 D Street, South Charleston, West Virginia.  There are billboards strategically pointing the way to our mall along the interstates, or you can phone (304) 744-8975 for directions.  Again, we're on I-64, Exit 56, easy on/off access coming from any of those three interstates.

Thanks for your visit!
Rita C. at Panoply

Sharing with any given number of these fine hosts:

Tuesday, September 15, 2015

Miss Luna C Goes to the Park!

Just for a little background on this series of related posts, you can read all about the makings of the Traveling Totes Tribe here. This past month, my tote (Miss Luna C) and I went to the park - two, in fact!
The photo above was taken in Mainstrasse Village, a quaint little town in Covington, KY. Each year they celebrate their German heritage with Oktoberfest and  Maifest, featuring music, foods, bazaars and much more, all focused within their city's central, historic district.
Within the park, there is a wonderful clock tower, which is otherwise known as the Pied Piper Bell Tower. Designed to look like a traditional glockenspiel, on each hour the tower balcony comes "alive" with animated figures.

Miss Luna C's second park trip was less urban, and a whole lot more adventurous for us. We traveled to one of our National Parks, The New River Gorge National Park, in Fayetteville, WV.
It was here where Mr. P. and I adventured through the forest on the Endless Wall Trail and, later, on the Bridgewalk. Prior to hiking the trail, we made a pit stop and I posed with Miss Luna C. Tucked back into the cargo space of the car while we hiked, the tote was full of water and granola bars once we returned from our adventures. You can read all about our adventures that day at the National Park in this post.
Where have all the other Traveling Tote tribe members been of late?  By all means, go check them out at the links below. I tell ya, these girls get around!
Samantha with Christabel @ Samantha Stone
and our non-blogger friends:
Colleen and Miss MacKenzie Joy
Tami and Miss MC la Mer
Be sure to come back on October 30th for yet another episode of Tales of the Traveling Totes and see what the girls have been up to. I'm already planning mine. ;)

To have a chance for winning her giveaway as part of the Tales of the Traveling Totes series, be sure to stop by Linda's blog @ More Fun Less Laundry. It's two terrific, padded hangers in the Courtly Check pattern (how clever, given the title of her blog). I love these!
September Giveaway at More Fun Less Laundry
All you have to do is visit her blog, and leave a comment, letting her know you were there. You can go straight there with the link I've provided - it's that simple!

In case you've ever wondered of the history behind The Story of Courtly Check, it's been well documented on the MacKenzie-Childs blog just in this past month. Just click on the hyperlinked title for that fascinating history.
The Story of Courtly Check
Until our next adventure, thank you for dropping in to visit. It's a pleasure to have you here!